Showing posts with label image of the child. Show all posts

Wednesday, May 13, 2020

Teaching Tools: Child Development Resources for Families

- by Wheeler DeAngelis, Constanza Henderson, Myra O'Neal, and Mahoussie Pierre, Toddler 1 South Teachers


Dear Families,
With several more weeks at home stretching before us, we are choosing to see this time as an opportunity - an opportunity to offer you a peek behind the curtain of our work that most years we don’t have the time or venue to share. As child development experts, we have a wide range of knowledge that we draw upon in our work with and understanding of your children. We would like to share some of these with you. In this post, you will find information on the following topics:
  • Roles
  • Sensitive Observation
  • Scaffolding and the Zone of Proximal Development
  • Being an "Oppositional Partner"
  • Infant Directed Speech
  • Bloom's Taxonomy


We hope that these concepts, theories, and tips will help you to feel like you have more tools in the toolbox for optimizing this time together with your children. And as always questions and further discussion are highly encouraged.
Roles


Roles are really important to children. They help children to understand what they can expect of specific people. For your children, who have been attending childcare since before they can remember, there has always been a difference between parents and teachers. From the child's perspective, teachers spend the day with them and offer tests and provocations. When children are at school, it is their version of going to “work.” When children are at home, you engage in a less structured way  with  your child while still providing boundaries and limits.  


We want to acknowledge that the condensation of these two roles is really hard on everybody. And some of us may find it impossible. That is OK! Children are built to learn, regardless of circumstance. Whatever you are doing to be present for your child is enough for them. Don’t bend over backwards to try to fill a role you’re not comfortable being in. 


For those who feel like you can be more intentional in the materials and activities you provide in this new combined “parent-teacher” role, we encourage you to lean into it a little. Simply acknowledging to yourself what role your child is asking you to play can be a big stress reliever and can guide you and your child toward better outcomes.

Taking on the "parent-teacher" role can be scary and since it is a new role for some of you we wanted to put together a quick little guide to some "teacher skills" that might help you in your interactions. 

First and foremost always remember that teaching is as much art as it is science. A well laid plan can mitigate a lot of the natural chaos that comes with toddlerhood but never all of it. That is when intention, flexibility, and engagement come into play. Just because something isn’t going as planned doesn’t mean that the learning has stopped. It is great to have expectations for how activities will play out, but if your child has other safe and reasonable ideas for how they want to play, go with it! This is sometimes how provocations unfold even in the classroom. Sure a cooking project teaches a lot about math and chemistry, but hitting the side of the mixing bowl with a spoon teaches about acoustics and physics. And if that’s what your toddler wants to learn today, then steer into it! And always involve them in cleaning up their own messes afterwards!

Sensitive Observation

What is it?
Sensitive observation is the process of stepping back and observing, not engaging with a child who is focused on some activity. Taking careful note of the contexts in which your observation is taking place, and how those contexts are affecting the child.


Why does it matter at home?
If you can find the time, even just a few minutes of sensitive observation can make a huge difference in how you understand your child's world. The goal of any good observation is to synthesize what we see and create more clear questions for ourselves to answer. 


Is your child getting cranky around the same time everyday even though they’re fed and rested and clean? Well that’s where sensitive observation comes in. Is there something happening that your child can hear but not see? Are they anticipating something frightening that will happen soon or reacting late to something that happened earlier in the day?


Through observing a child in their environment we can begin discern the reasoning behind a child’s behavior rather than reacting to the behaviors themselves.

https://www.janetlansbury.com/2010/05/magda-gerbers-gift-to-grown-ups-parenting-that-engages-the-mind/

---
"Do less; observe more; enjoy most." - Magda Gerber


---


Scaffolding and Zone of Proximal Development 
What is it?
These two concepts are at the core of most of our work with your children. Zone of Proximal Development (ZPD), is a part of a theoretical framework that separates all potential activities into three categories:

1. Things a child can do on their own.
2. Things a child can't do. 
3. Things that they can do with help. 
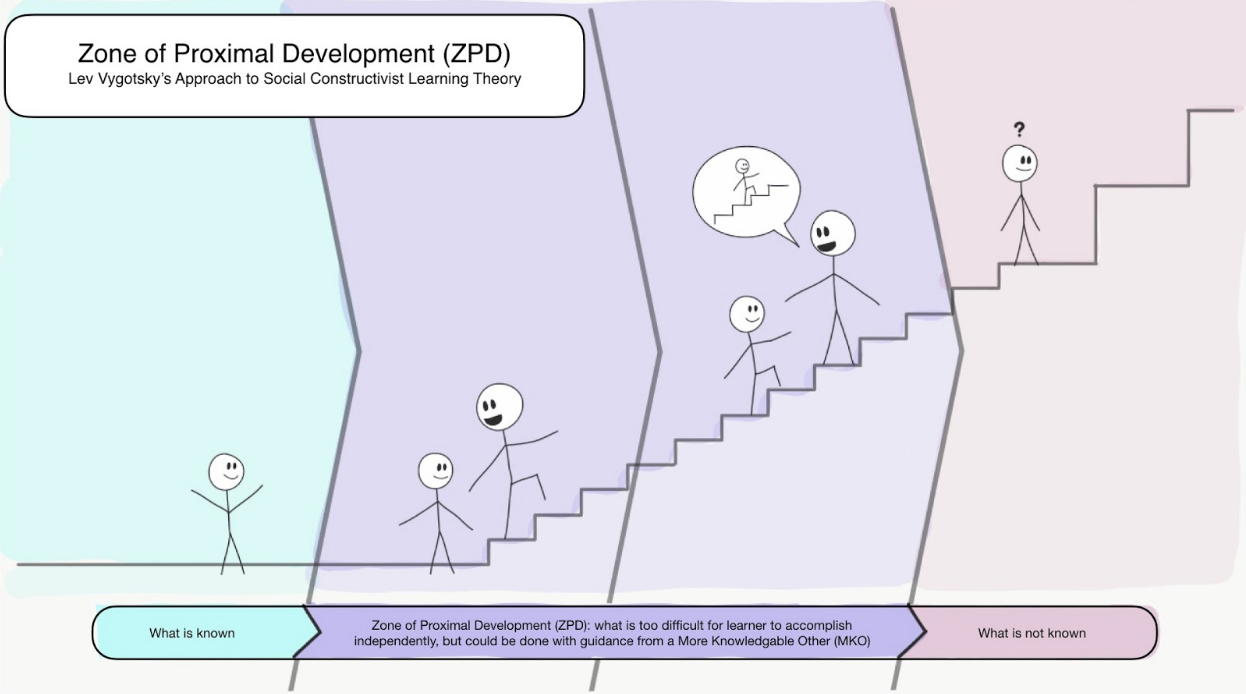

https://medium.com/applied-learning-theory/constructivism-29e8949330a
In this image the staircase and the adult illustrate the concept of scaffolding.


This third category is the child's ZPD. Scaffolding is simply a term for all the help offered by an adult to move an activity out of their "can't do" and into their Zone of Proximal Development.


Why does it matter at home?
An understanding of which category your child keeps each activity in, will help greatly with your activity selection. 

- Activities from their "things I can't do" category will lead to the shortest and most frustrated play sessions. 

- Offering your child an activity in their “things I can do” category, like a familiar book or puzzle, will lead to longer more focused play times. 

- Activities from their ZPD will lead to the longest play and highly meaningful interactions  but will  some require adult facilitation.

Being an “oppositional partner” 

What is it?
Occasionally when you play with your child, create your own play plan and stick to it. If your child asks you for the materials you are using, tell them that you are using them and make a plan for when they can have a turn.


Why does it matter at home?
Children learn a lot from playing with a partner. The give and take of these interactions are crucial for positive socio-emotional development but they are hard to replicate at home without another toddler. It is more than the practice of turn-taking, it also teaches patience and respect for the play needs of others. Creating a play plan of your own and sticking to it can help to replicate some of these interactions.

Infant Directed Speech
What is it?
Infant Directed Speech (IDS), is the way that adults alter their voice to speak to children. Basically it is a system of slowing and simplifying your speech patterns in order to give children more time to process what they are hearing. IDS is characterized by higher pitched voices and increased repetition. It's a reflexive process and you all do it everyday. It should not be confused with "Baby talk" which is the removal of informative words from a sentence and replacing them with gibberish. Baby talk does not provide the same developmental benefits of IDS.


Why does it matter at home?
Toddlerhood is a critical period for language development. In normal times, children develop their understanding of prosody, grammar and vocabulary by hearing how people around them speak and using what they hear to create a linguistic baseline. 


In quarantine times, children are exposed to fewer of these "in the wild" language encounters, so the linguistic model that you are providing for them takes on added weight. A good rule of thumb is that you should talk to children in the way that you hope they will, one day, be able to talk to you.

Bloom’s Taxonomy  

What is it?
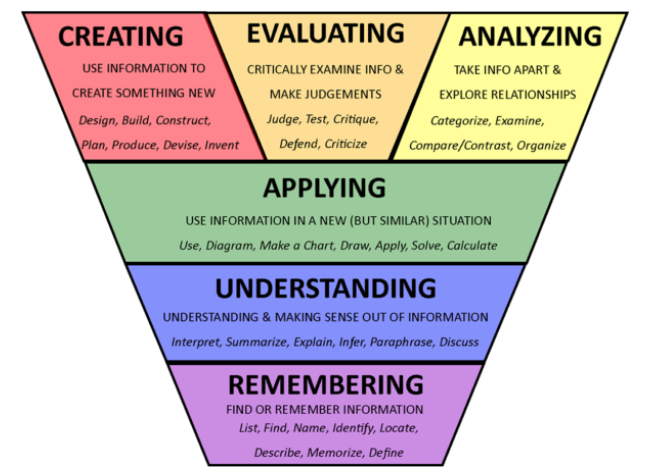
https://bokcenter.harvard.edu/taxonomies-learningBloom's Taxonomy is a hierarchical model that classified learning objectives/outcomes from least complicated to most complicated.

Why does it matter at home?
Bloom's Taxonomy is a great way to evaluate communication between yourself and a child. When adults play with children they tend to ask a lot of questions. This tendency is a common, and developmentally critical, piece of  IDS. 

Asking questions helps children reflect on their own actions but it also increases how much of their brain they are using during that interaction. And for this reason, the type of question we ask matters tremendously. 

For instance, answering the question "Is that a tiger?" requires less thought processing than answering the question "What is that?" Asking "where is it going?" or "how does it move?" require even further engagement. By steadily increasing the complexity of the types of questions you are asking (moving from the base of the pyramid up) you will increase the depth of your child’s engagement with the subject material. 

Don’t be afraid to ask questions that are “too complicated.” Toddler’s have a built-in failsafe for this scenario. If you ask them a question that they don’t have the underlying knowledge to answer, they will either not answer you at all or answer a completely different question instead. 


Wednesday, April 1, 2020

The Possibilities of Paint - Ideas for At Home


Let's talk about paint!


For some people, the idea of painting at home with their young child is exciting. For other people, it is intimidating. For almost everyone, the word "messy" probably comes to mind.

At the same time, part of what is wonderful about paint is its possibility for expression. The exploration of gesture, color, and (especially with thicker paints) texture is a beautiful outlet for anyone (not just children), and can be an excellent way to center ourselves in the moment. This can lead to messiness, but, to me, the value of what is at work behind the messiness far outweighs the momentary stress of having to clean up a painty child.

So how do you set up paint at home in a way that feels manageable while still allowing your child freedom to actually explore the material? What if you don't have a ton of art supplies lying around? How can I be a part of my child's paint experience without taking it over?

Let's talk about these things!


Minimizing Mess

What can I handle?
Before setting up, think a bit about how much "mess" you feel comfortable with. Are you willing to risk some paint getting on the floor or a cabinet? What about paint getting on your child/their clothes/your clothes? Answering these questions honestly can help you decide what sort of experience you want to curate.

Choosing a setting:
A few options for setting up include...
- seated at a table
- in a dedicated space on the floor 
- outside (if it is warm enough and an outdoor space is available)
- in the tub (for super easy clean-up)
- at an easel or upright space (if you don't have an easel, you can take paper onto the refrigerator, kitchen cabinet, or wall)

Selecting your wardrobe:
No matter what the set-up, I would suggest that you (the adult) wear clothes that you don't mind getting painty!
For your child, you can choose between stripping to a diaper or undies OR putting on some paint-friendly clothes (either their own clothes that you don't mind getting messy or - my personal fave - an oversized t-shirt).

Protecting surfaces: 
Whether you are using a table or the floor, it is helpful to have something underneath your painting area to both protect whatever surface your painting on AND to define the space visually. Some possible materials to use for covering your floor or table include:
- a canvas dropcloth
- a table cloth
- a tarp
- a sheet
- large sheets of newspaper or other paper
- a towel (less ideal for table due to the thickness)
- parchment paper or plastic wrap (for table)

Prepare for clean-up:
It is helpful to set up near a bathroom or kitchen in order to be close to the sink, but whether or not this is possible, you can still be ready for clean-up by keeping these things close by!
- damp washcloths (some children might want one nearby to use as they go)
- a bowl or bin to put paint supplies in when finished (add water and soap and you now have a water activity!)
- a towel (to wrap up a messy kiddo)


Collecting Supplies: Recipes, Inspiration, and More


Paints
If you have washable tempera paint or watercolor paints (either liquid watercolor or a palette of dry color), these are excellent options to use at home. If you don't have either of these, never fear - you can make your own paint! Both of these paints are thick and fun to use for textural explorations. They will last for a few weeks if refrigerated. Offer them in small cups or bowls, in an ice cube tray, or straight onto the paper!

No-cook Flour + Salt Paint
-Mix together 1/2 cup of flour and 1/2 cup of salt.
- Slowly mix in 1/2 cup of water.
- Once smooth, divide into containers and add food coloring or liquid watercolor for color.

Cooked Finger Paint
-Stir 1/2 cup of flour with 1 cup of water in a pot over medium heat until it becomes a paste-like consistency and begins to pull away from the pot.
- Add a pinch of salt.
- Add 1/4 cup (or more as needed) of cold water to get your desired consistency.
- Divide into containers and add food coloring or liquid watercolor.

Painting Tools
Although brushes are the traditional tool for painting, they are by no means the only thing you can use! Here are a few other ideas for things to set out with your paint:
- cups or jars, spoons, and popsicle sticks for mixing colors
- leaves, flowers, pinecones, rocks (to use as paint tools or be painted on!)
- chopsticks, q-tips, sticks, combs, and forks for making lines through thick paint
- lids, spools, and other loose parts to use as stamps
- toy vehicles to make tracks through paint
- cotton-balls
- coffee filters
- sponges (as is or cut into shapes)
- droppers
- squeeze bottles
- and fingers of course!

Parent as Partner
So your paint experience is all set... but what should YOU do as your child paints? Here are a few suggestions:
- Paint on your own paper or collaboratively (if your child is so inclined) while echoing your child's movements - let them be the teacher! 
- Paint nearby to offer simple suggestions for how to use the materials (such as how to drag a comb to make lines, press a painted flower onto paper to make a print, or create a pattern using different colors or shapes). 
- Assume the role of documentarian and prop master - focus on taking pictures (and even taking notes if you want to try it!) and having extra paint, tools, and paper at the ready.
- Start in the abstract rather than jumping in to representational paintings (this can easily distract children from their work as they become more invested in what you are doing).

A few tips if children want you to paint for them or get discouraged because "yours is better":
- Gently say that you are not going to paint for them, but would be happy to show them how you did a certain technique for them to try. Walk them through it, with lots of encouragement. Then find something that you would like them to teach you how to do.
- Remind them that you have lived a lot longer than them and have had a lot more opportunities to practice! This is a great opportunity for them to start practicing, too.

**Also, check out these posts for preschool, toddler, and infant parents!**

Be well and enjoy!
Katie & Nova


Tuesday, March 24, 2020

What to do with Water? - Ideas for At Home

Have you ever wished that you had a sensory table at home? Well here are a few ideas for how to set up a water exploration space! You can go as simple or as elaborate as you would like, and there are several ways you can tailor what you offer to fit your space and the interests and age of your child! Of course, you could always explore other sensory materials in similar set-ups, but since water is something we all have access to, that is what I will focus on here.


Style #1: Simple and Spontaneous
   
The basic idea: find a wide, open bin or container with a flat bottom, fill it with water, and put it on the floor on top of a towel. This is something that I've pulled out multiple times when Nova has decided that all she wants to do is play with the cat's water dish. When she was still a baby, I used a ceramic baking dish (see above), because it had lower sides that she could reach over easily, and it was a little heavier and harder for her to slide around or accidentally tip over (kudos to former teacher Seana Williamson for the original inspiration). Now that she is a toddler, I have been using a plastic bin that is deeper and less breakable. 


 Style #2: Water Exploration Station


The basic idea: take the container described in the section above, elevate it, and add more surface space for transferring water. Maybe you have a child-level table that will hold your water bin, or maybe (like me) you have a ton of cardboard boxes still hanging around from when you moved. Place your container on top of whatever surface you choose in order to bring it to a good height for your child to be able to scoop and dump. It is nice to have extra space along the side for other containers to be added or for setting down utensils that aren't in use. I put together the above set-up in a matter of minutes yesterday by taping the water bin to a cardboard box with packing tape (I probably didn't really need to do this, but I figured better safe than sorry), lining the leftover box surface with a kitchen towel, and adding another plastic bin with the lid still on as additional "counter space."

What goes with water? - Material Suggestions

Now that you have your "water table," here are a few ideas for different types of set-ups you can create.

Cooking and Mixing: bowls, whisks, measuring spoons, measuring cups, ladles, muffin tins... basically whatever you want to grab out of the kitchen

Fluid Dynamics: funnels, containers of different heights and sizes (preferably clear or translucent), scoops, droppers, basters

Paper Pulp: sheets of paper (ripped up or not) to submerge in the water; you can also offer surfaces to place the pulp to dry, such as plastic-wrap lined cooling racks or bowls to create dome sculptures. Just playing with the strange squishiness of wet paper can be pretty fun on its own, too.

Color Experiments: small containers of different colors with spoons or droppers (or squeeze bottles if you have them!) full of colored water (I like to use liquid watercolor paint, since it is washable); or freeze ice cubes with different colored water, then add them into the clear water to watch it change.

Bubbles: there are lots of tips for making bubble solution if you want to actually blow bubbles, but if you just want sudsy water, any dish soap will do. Combine with materials for stirring up more foam (whisks are great for this) and scooping and transferring it. If you are trying to blow actual bubbles, you can make some bubble blowing tools at home, too.

Nature's Gifts: Combining natural materials with water is always great fun. Rocks, shells, leaves, pinecones (watch what happens if you submerge dry pinecones in water for awhile - it's fascinating!), flowers, etc. can all lead to interesting games in the water table. If you have any large rocks, it can be interesting to try brushing water onto their surfaces and seeing how the color changes.

Mix and Match: And of course, any of the above ideas can be combined!


A few general tips:
- Put at least one towel on the floor AND have an extra on hand to wipe up additional spills. 

- Set up in the kitchen if possible - if not, try to be near the kitchen or bathroom so you have easy access to a sink for either getting more water or pouring water out, as well as materials for clean up.

- It's okay to set limits, AND it's fun to look for possibilities! For instance, one day Nova started to transport water across the kitchen to her pretend cooking area, leaving a trail of drips across the floor. I ushered her back over to the water-play zone, while also bringing some of her play pots and pans back with us so she could include them in her water experience.

- You can decide how "permanent" you would like it to be. Maybe you create a set-up that you leave out for a few days or more. Maybe you keep your materials tucked in a corner to pull out as needed. Maybe you set something out, then put it all away when you are done because the last thing you need is more piles cluttering up the house. Do what works for you!


- Start out simple - you can always add more later! Both at home and at work, I often have an extra element set aside to bring out when interest starts to wane (such as the colored ice cubes seen above). This helps to extend the experience!

I hope this offers you some ideas for your days at home!

Be well,
Katie (and Nova)

Monday, December 19, 2016

The Power of Loose Parts

What is a “loose part”?
Loose parts are essentially materials that can be moved around and manipulated in many ways, and which don’t necessarily have a single assigned “job” or use.

Why should we play with them?
In the 1970s, the Theory of Loose Parts was developed by architect Simon Nicholson in response to what he saw as a lack of opportunity for children (and adults outside the realms of architecture) to play around with concepts of building and construction in their daily lives. The principle of the theory is as follows:

“In any environment, both the degree of inventiveness and creativity, and the possibility of discovery, are directly proportional to the number and kind of variables in it.”[1]

In other words, when people interact in a given space, the more options they are offered, and the more the available options can be combined and recombined, the more interesting and diverse the results. The repercussions of this idea for the early childhood classroom are clear – when we offer children more materials that are unscripted, hold multiple possibilities, and can be put together and taken apart in numerous ways we see more creativity, engagement, and discovery on the part of students (and I would argue on the part of the teachers and parents as well!). And these benefits are not limited to the realm of building and spatial thinking, but can extend far beyond, into the realms of dramatic play, artistic expression, literacy , and mathematical thinking… to name a few.

Below are just a few instances of children at work with loose parts in our center. Where do you see inventiveness and creativity at work through these materials?


Tubes of varying sizes inspire Alec and Grace to investigate stacking them and trying to fit them inside each other. Grace tried to cover one long tube with several smaller ones, while Alec tried to see if he could nest two tubes of the same size. 


Atom discovers that these small plastic containers stack one on top of the other very nicely. He builds a tower, taller, taller, taller, until it begins to wobble. When it falls down - crash! - he picks up the pieces and begins to build again. 


J and F investigate the structural integrity of this "house" made of carpet squares. It was able to hold several heavy blocks for its "roof" before it finally collapsed. 


Julius and Quinn examine a tube stuffed with mylar together. The mylar is crinkly, sparkly, and noisy, and the tube is tricky for small hands to manipulate. It rolls and tips as they try to angle it just so, searching for the best way to look in and pull out the mylar. 


Leon and Cathy found some pieces of sheer fabric in the movement studio while they watched a projection of some Riverdance performers. They used the fabric as costumes, as something to hide behind, and, finally, as something to hold behind their backs, the same way some of the dancers held their hands behind their backs. 


Jihye and Emmett discovered a wooden place-mat and a piece of bumpy, translucent plastic in the Studio. Looking through them, they noticed that their view of the world changed! The other children in the Studio also noticed that it changed the way Jihye and Emmett looked, making it hard to see all of Jihye's face, and making Emmett look "foggy." 


[1]Nicholson, S (1972). The Theory of Loose Parts: An important principle for design methodology. Studies in Design EducationCraft & Technology 4, (2), 6. 

Monday, March 14, 2016

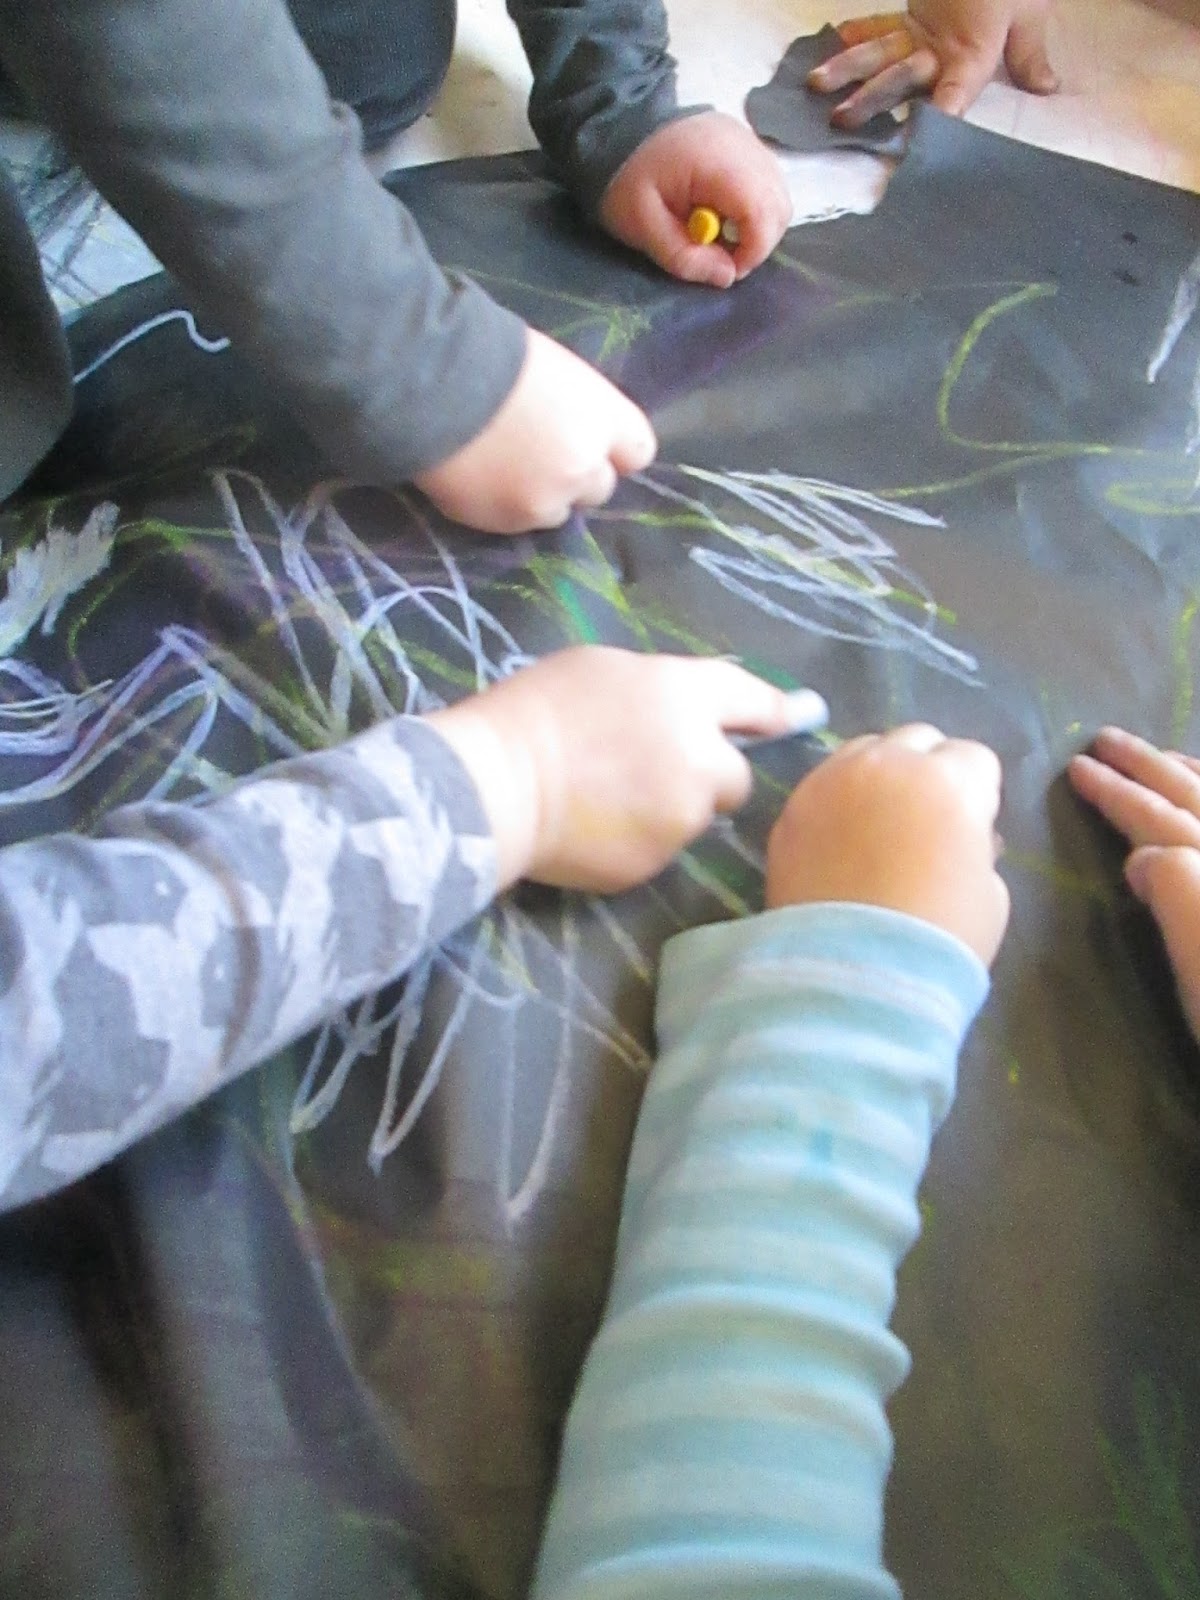
The Mightiness of the Pencil, Crayon, Pastel, and Marker

“Drawing is the discipline by which I constantly discover the world.”
- Frederick Franck

For over a month, children across our center have been coming to the Studio to draw. They have been drawing with a variety of materials - from markers to pencils to pastels - and they have been offered a number of provocations. The results have been by turns energetic, controlled, colorful, monochromatic, expansive, minimalist, exploratory, expressive, abstract, and representational. Working with children of all ages as they continue to explore the world of drawing caused me to reflect on why this process is so powerful, and has been throughout human existence. For most artists, even those who work in three-dimensional or technological forms, drawing is a necessity. In the case of James Castle, an artist who was born deaf, drawing became the means of communicating his inner life. It is, in many ways, an essential "language" for us as human beings. 

This leads me to wonder:
What does drawing offer to young children? 


Drawing works a variety of important muscles – the grip of the fingers, the flexing of the wrist, the bending of the arm. It helps to build fine motor skills, but it can also be an outlet for gross motor movements. 

Drawing translates their movements into creation - each gesture leaves behind a trace. If your arm moves in a circle, your mark also curves round and round. Pushing your drawing tool straight forward leads to a sharp, straight line. A pencil in each hand means twice as many marks appearing on your paper. Many fast, back and forth movements leave a tangle of zigzags on the page.


Drawing invites children to work as individuals to bring their ideas to life – they conceive their own concept, they choose their own materials, they determine the composition. If they return to the same work over and over again, they come to recognize the drawing as their own.


Drawing offers children opportunities for collaboration – they find space alongside each other to work on the same surface, they share materials and ideas, they discuss, dispute, and compromise. 


Drawing invites children to make connections – they connect the lines and shapes they create with the world around them, with symbols, with movements, with each other. Drawing from life - whether doing portraits, self-portraits, landscapes, or still lifes - invites them to look closer at sights they see every day, to notice and appreciate their nuances. 


Drawing helps children enter into multiple literacies – they imagine their series of squiggles becoming words, they see lines connecting to form letters, they begin to draw representationally. Zigzag lines across a paper become a letter written to parents being missed. Three dots remind someone of their symbol, or a curved line looks like the S in someone's name. 


There are surely more things to add to this list - these are simply the ones that come to my mind when I think of the power of drawing. 

What additions would you make? What does drawing offer the young children in your life? What does it offer YOU? 


Thursday, October 23, 2014

Starting off the Studio: Ruminations and a Paper Investigation

How will we use the Studio? 
Which material will we use to begin our Studio journey?

These questions are constantly on my mind, not only at the beginning of each school year, but during all the months that follow. Each year, the use of the Studio shifts a bit as we try to navigate the ideals we hold as a Reggio-inspired center and the realities of serving 90 children, infants through preschoolers, spread throughout three separate buildings. Now that we are settling comfortably into the routines of the year, I want to take some time to reflect on the questions that have driven these shifts, to share some thoughts about what I do and why, and to tell a little about the subject of our first Studio adventure - paper.

How will we use the Studio?

Right now, children's visits to the Studio are primarily centered around getting to know a few key materials one at a time, building a repertoire of expertise that will serve them throughout the year. A few groups have also started visiting together to explore particular themes of interest, such as ramps and balls, music and movement, and building train tracks. This really points to the fluid and flexible nature of the Studio - it is an art room, a laboratory, a meeting room, a dance floor, a recording studio... and the list goes on. However, throughout all of these pieces, it is a place for focused work of one form or another. This focus may come from the side of the materials ("We're going to explore wire today! How can we change this piece of wire?") or it may come from the side of ideas ("Today is about building our animal sculptures together! What parts do we need? What materials should we use?") - but in either case, the focus is there.

This is a practice that has taken me several years to develop, and it is something I am still working on. When I first took on the job of atelierista, this element of focus was already partly in place, but there was also a sense of "free play" - of doing whatever you wanted with any of the materials. At first I went along with this, knowing that this is how things had been done, but I felt that there was something missing - something that I believed was at the heart of the Studio. I saw a lot of children using materials for the sake of having them - gluing piles of beads and glitter to paper or wrapping sticks with a mile of tape simply for the sake of taking them home to their mommies and daddies. There is nothing wrong with this, of course, but, as my fellow atelierista, Anna Golden from Sabot at Stony Point, writes, "... that's not what studio thinking is all about."

So what is studio thinking about? It can be stated as a framework, a set of eight habits of mind, such as "envisioning," "developing craft," and "engaging and persisting."  For me, it is about learning about materials in order to use them to create the things you want to create and to follow through on your ideas with success. It is also about developing a practice of using materials intentionally and respectfully. It is about recognizing that every material has potential that is worth exploring. These are the ideas that I strive to embody through our use of the Studio, whether the children who are using this space are 5 months or 5 years.

Which material will we use to begin our Studio journey?

In the same blog post, Anna asks three important questions regarding materials for a Studio:

How do children use materials? 
Which materials serve children, considering Gardner's multiple intelligences?
Which ones have most potential for creative thinking?

The Studio is home to a variety of materials - paint, clay, glue, yarn, cardboard, tape, fabric, markers, wire, wood, and more. I feel that all of these can be used in multiple ways, can serve as outlets for sensory experiences as well as expression, and have a lot of potential for creative thinking and problem solving. The question is, where should we begin this year's journey in developing the "studio thinking" already mentioned?

This year, I chose paper as our starting place.

Paper is a material with a huge amount of potential. It is extremely malleable, yet it also has structural integrity - it can hold the shape into which it is twisted or folded. It comes in a variety of colors, weights, sizes, and textures. It is also very accessible - it is my go-to material for infants at the start of the year. A fellow teacher, Lise White, and I once followed an extensive investigation of young toddlers and paper. As one of the proverbial hundred languages for creative expression, paper is one with a wide and fascinating vocabulary.

Paper also offers a challenge. It is a material that we often use as a surface only - a place to draw and write. We don't often use it on its own, for its own unique properties. In offering paper to children, I was beginning the year by asking them to look at things - this material specifically - in a new way.

In order to really get at this idea of learning a material's own unique vocabulary, I initially offered paper to the children entirely on its own. No drawing utensils; no scissors; no tape; no glue. Just paper. Granted, the paper itself did not take just one form. For visual simplicity, all of the paper was either white or black, but some of it was small, and some was big; some was hanging from the ceiling, while other pieces were spread on the floor or arranged on a table; some pieces were flat and untouched, while others were already wrinkled from being crumpled; the weights of the paper ranged from thick watercolor paper to very lightweight tracing paper. In order to invite children to start thinking about the many possibilities of this material, it seemed important to offer up a variety of possibilities as to what this material could look and feel like to begin with. 

At first, many children asked, "Where are the markers? We need scissors!" Even some very young toddlers entered with the question, "Markers? Draw?" The challenge I had foreseen was clearly there - these children were used to acting on paper in a two-dimensional way. I was interested in seeing what they could do when they started to think more three-dimensionally. I gave them one question as further provocation: "How can we change this paper using just our hands and bodies?" Here are just a few answers from children across the center ...

Sam shook and waved the paper, sometimes wrapping it around his body into a big "mountain." 

Phineas, Harriet, and Alisa used a big piece as a house. "Come through the door in the front, not the back."  

Morgan ripped the paper into smaller and smaller pieces. She found that if she pulled it in one direction, it ripped easily, but if she pulled it in the other, she couldn't rip it at all.

Raphael scrunched different papers next to his ear. "This one sounds different. This one sounds soft. This one sounds loud."
Alvida and Lundy pulled down the paper from the ceiling. "Reach up," Alvida said, encouraging Lundy to help her try to pull down the pieces that remained. 

Justin ripped a piece of paper into small scraps. Arranging theses careful, he announced, "This is my control station. These are the controls." Each piece of paper became a button or a lever. 

"You can make shadows on it," Jone said of a big piece of paper lying on the floor.
E. folded the paper as she explored the different textures of its two sides.

Through this experience, the children learned a great deal about the properties of the different papers. For instance, some were easy to rip, while others were nearly impossible. The diaper table paper was flexible enough to  tie together, while the cardstock and watercolor paper could actually stand on their own if they were folded the right way.

I love that the Studio can be used as a place to not only build on children's interests, but to challenge them to build new skills and try on new perspectives. By investigating paper on its own, in this focused environment, children across our center discovered so many more uses for it than merely drawing or painting on it - they began to appreciate it as a unique material in its own right.

Do you see "Studio thinking" at work elsewhere in our center? 

What memories do you have of being introduced to art materials - of getting to know these "languages" ?

Friday, September 12, 2014

Teachers are Learners: Illustrating a Year of Project Work, Part 3

The following is the third and final part of a series of posts illustrating the ways our teachers took on the different principles of project work last year. Click here to find the first part and the second part.

Bring the small group work  back to the larger group and find ways to integrate the work into larger classroom life.


From the early stages of her group’s music project, Serena encouraged the budding musicians to share their work with their classmates (and our resident musician, Wayne). In the beginning, their experience of performing a song in progress allowed them to get some feedback to help them improve. Later, they worked to catalog important vocabulary words and use them to write new songs, one of which they also performed for their classmates and parents. As their vocabulary became more nuanced and consistent, Serena encouraged them to share their new system as useful tool for other songwriters in the classroom. Through this practice, the work of denoting and writing new songs has spread into the greater culture of the classroom, adding new focus to a general interest in music making.


Choose your small groups carefully, thinking about their relationships to the concepts and with one another.

When Tracy was considering the composition of her sea monster group, she took into account the different possibilities that the project held for each child. For some children, the experience would help them practice listening to others’ ideas and integrating them into their own. For others, it offered the possibility of a leadership role – getting to speak up and gain confidence as an “expert” on sea monsters. In her careful formation of the group, Tracy brought together children who had normally not played together much before, but who shared an interest in sea monsters and could benefit from each others’ strengths.  Among the group, there were storytellers, artists, safety advocates, and trap-builders, each working to make the lore of the sea monsters richer through their contribution. In bringing together this diverse group of children, Tracy not only helped build a successful project group - which they collectively named Team Blueberry Pickle - but also helped to foster new friendships and a greater sense of community throughout her classroom.

Stay curious about what you observe.
We were unsure what project work would be like for babies and young toddlers, but we were certain that our teachers would find ways to collaborate with some of our youngest citizens. While Cathy watched how babies played with balls and ramps for inklings of understanding, Eileen studied friendship, reflecting upon the demonstrations of empathy and fondness that she saw to draw her conclusions. Brae thought long and hard about how babies communicate with sign language and then with speech. She wondered why children chose one mode of communication over another. This team had deep, thoughtful conversations about their projects, and how they could continue to explore side-by-side with babies. On the other hand, when Henna joined the Toddler Two North team in the middle of the year, she had to build new relationships with the children in her class, while also listening for that special spark of interest that indicates that a topic might be worthy of deeper investigation. She knew that food held a special fascination and offered a number of different ways for the children in her class to relate to it. She was persistent in her study of the children in her care and their relationship to food, and offered a number of different and delicious provocations to her class.  


Celebrate and honor the children’s work by ending it in some meaningful way.

As our year (and our projects) come to an end, we are excited to see what celebrations unfold for these many projects. Clearly these children and teachers will continue to learn more, about the workers in their community, about how buttons influence the world around us or how to communicate with one another. However, one way that we honor children's collective exploration is by following the waxing and waning of their interest - by helping their work together form a shape with a beginning, middle and an ending. Part of the practice of progettazione in Italy, and the projects that happen elsewhere in Boston and all over the US, is to recognize the work that's happened, look at it as a whole, and celebrate it with families and children. In the final weeks of our school year, teachers, families and children marked this moment, honoring the learning they did and relationships they built. Seana planned a plane-decorating party for her paper airplane group, Carmel and Aline invited families to co-create a bird guide that will live on in our center, and Miwako’s group invited their classmates and parents to the final performance of the play they created, to name a few. What a wonderful end to an amazing year!