Wednesday, April 29, 2020

Extended Encounters: Reflecting on our long-term material investigations

“A first encounter for children with materials… is a necessary step in children’s process of knowing. Through such encounters and explorations, children build an awareness of what can happen with materials, and adults build the ability to observe and support the significance of each particular experience.”
-        Giovanni Piazza, “Materials, Relationships, and Languages,” in ed. Gandini, Hill, Cadwell, and Schwall, In the Spirit of the Studio, p. 13.
-----------------------

How do we build a relationship with a material? What can we gain by continuing to engage and re-engage with a material over an extended period of time? These were some of the questions at work for both teachers and children this year as each classroom embarked on a three-month-long material investigation together.
At the start of the year, each classroom chose a specific type of material (light, paper, loose parts, clay, natural materials, paint, or fabric) to explore, signing on to have that material present in their classroom every day and be part of their documentation, reflection, and curriculum planning for the next three months. Five classrooms chose natural materials, one chose paper, one chose clay, and one chose loose parts, and away we went!
Our material investigation was by no means an easy undertaking. It required stretching, growing, learning, and disequilibrium on the part of teachers and children. The same way that children often express frustration as they learn a new skill or grapple with a new concept, many teachers found themselves challenged to think differently about their material and its possibilities. 
Different classrooms took different approaches to this project – some classrooms set themselves a focus from the start, while others explored more openly, waiting for an interesting question or idea to arise. Some materials came with particular challenges that necessitated flexible thinking and collaboration on the part of teams. For many classrooms, the material itself provided a lens or portal through which other threads could be explored. In a few cases, however, the natural material itself proved the catalyst for going deeper, encouraging the children and teachers to learn more about that material’s unique possibilities. 
Many of our teachers took time to reflect on their experience with this long-term investigation, using the following prompts as a starting point:
  • How did your understanding of the material and its possibilities change over time?
  • How did children's interactions with the material change over time?
  • What was surprising or challenging to you during the investigation?
  • What brought you joy during the investigation? 
Excerpts from their reflections are collected here under the groupings of “overcoming challenges,” “a portal to possibilities,” and “going deeper” in order to share one facet of our work with you. Of course, there is always overlap, and there are cases where teachers’ words could fit into any of these categories. In each case, I used my best judgement to put them under the heading that seemed the best fit. Thank you for reading and please share any of your own thoughts and experiences from this investigation!
- Katie
----------------------------------------------------------------------------
Overcoming Challenges
Many challenges arose for different teachers over the course of this work - some expected and some not. Sometimes it was a challenge to find the right approach to the material in order to engage both the children and teachers in the exploration. In other cases, the material itself necessitated flexible thinking around issues, such as how to use it safely with young children. 


“It was hard at the beginning to include a material that none of us were quite interested in. Over time, though, the children's interest in this material evolved to another unexpected way of usage: Space. Children demonstrated awareness of the material as a tool to create a physical space and define it, moving the paper as a "stage" to sit, jump or play on it, or using it to hide. This was amazing to see. It brought me joy to realize the many ways and uses the children gave to sheets of paper.”
Connie, Toddler 1 South


“At first, I thought that the children would show interest in the properties of paper by exploring it in ways that included trying to rip it, crinkle it and scrunching it up into a ball. I was surprised to see that the children rarely did any of those things and would only engage with the paper when teachers initiated the paper play… The challenge for me was that I didn't know what the next steps would be after making paper. It was challenging to continue to have to think about this material that the children seemingly weren’t interested in - and I think that the teacher's lack of consistent of enjoyment with the material also played a huge part in it as well….I think that the dynamic between the children and paper, and each teacher's investment in this material investigation shifted when I hung the Tyvek paper up in the corner. It led to thoughts about space and prosocial behaviors amongst the children. This was exciting! It felt harmonious to be able to combine the paper investigation with a thread that was so prevalent in our room.”
Myra, Toddler 1 South


“Exploring natural materials in Infant South has been both invigorating and just a bit worrisome. It has been a learning experience when it comes to offering babies materials that are safe. But mostly it’s been fun to watch what they do with leaves, how we offer leaves and how they have been studying the myriad of leaves. It's been such a joy to watch how our babies have shown how long the process of exploring one material can go on for.” 
Dilcia, Infant South


“Something I found challenging was... diving deeper into our seed pod focus of our natural materials. We had some photos of seed pods but we never got around to doing anything else with the thought. Another challenging thing... We had a plan to crack open some acorns a few more times with T2 but because it’s considered a choking hazard, we had to stop. Unfortunately, something out of our control...However, at my old center, bringing any materials from outside or from home was never even heard of and I was told we weren't allowed to (along with many other things we weren't allowed to do).” 
Kelsey, Toddler 1 North 


“Throughout this emotional time [the start of the year], clay was offered during each morning and afternoon provocation….Almost immediately, the clay became food… Each child seemed to find comfort and safety with this thread…. [However} after a few months of their exploration of cooking and clay, the idea seemed to fizzle. I was frustrated because it felt like we hadn’t done enough. It seemed like other rooms had found their “thing” and were taking their material investigation further and further each day. It wasn’t until Ivonne brought up the idea that, “children will explore something until they find an answer, or will give up because they have lost interest” that I was really able to reflect on our use of clay. Did the children let go of the cooking idea because they finally felt safe and secure in the classroom? Were they able to accept the idea that their parents would come back at the end of the day? Was cooking a way for them to connect, share and learn alongside their peers, despite their big emotions? 

These were questions I wanted to find answers for. So, I observed. I watched the children come into the classroom each morning, happier and happier as each day passed. I listened as parents told us “She spent the entire weekend missing school and wanting it to be Monday!” I learned from the children that not all questions have clear answers - sometimes you have to stop looking to find it.” 
- Imy, Toddler 2 South 


“At the beginning the kids didn’t really know what to do [with the natural materials]… they mostly didn’t really use them. What brought me joy was, as we left them out, they used them more and more, and they used them lots of different ways.” 
- Kerri, Toddler 2 North 


“Our interactions with the material first started off very simple with a slab of clay on the floor. Children would break off pieces of the clay and call it pasta, pancakes, or waffles, perhaps mimicking what they had eaten for breakfast before coming to school… After some time exploring the idea of cooking, and adding natural materials, interest started to fade away from the clay, so we decided to change how it was presented… to help them re-engage with the clay… but we had no such luck. At this point, we were feeling a bit stuck, but we then started to think about the element of surprise, and hiding/finding objects [in the clay]. We first started to do this just in the studio, bringing one group to the studio to hide objects and one group to find objects. Through this we noticed that children started to become curious about loose parts, so in our team meeting we talked about bringing loose parts to the classroom. Once this was done, children started to re-engage with the clay, and we observed children build (vertically and horizontally), hide, make marks, and so much more.”
Kate, Toddler 2 South


“Not that it was a competition, but I'm not sure who has enjoyed our material investigation more; the babies or me. I obviously love natural materials, and I was excited to share my enthusiasm with our babies, families, and teammates. I was a bit intimidated at first, however, because I am not used to delving into an investigation right away, especially when we are so focused on just getting to know our babies and help them eat and sleep. But having a focus on a type of material, even if I didn't really get to observe it in action every day, still helped me get to know our babies through their individual styles of exploration….[sometimes the material itself] was ancillary to the relationship building that was happening at the forefront of their exploration. I learned about how an ongoing material investigation like this is not just about them learning about the material; everything that comes out of it is valuable.”
Amara, Infant South


“In the beginning of our investigation, hearing the term ‘loose parts’ made me wonder what that really means. I have been taking out some loose part materials to investigate over the past years, but I had not really intentionally thought about how much a loose part can be used in different ways and how children would investigate this specific material differently than others...I also struggled to set up the classroom with only loose parts - I still find myself taking out blocks and other materials that I never thought would be considered loose parts. But I learned that anything you find is considered to be a loose part.”
Gladys, Infant North 

Thursday, April 9, 2020

Pathway Play: Creating a Marble Run

by Amanda Caulfield, Preschool 2 Teacher at PTCC

The Inspiration:  
Children in Preschool Two have been interested in creating and exploring pathways during their play.  This has ranged from building paths in the sand to constructing ramps and roads as a part of our work with mapping.  One of the ways that we have been observing children’s thinking related to pathways was through their construction and use of marble runs.  I have always been interested in observing the problem solving strategies that emerge when children work with marble runs.  

I chose to create this provocation offering because I felt it was something that could be easily executed and extended at home using everyday materials.  I also felt excited about the prospect of parents being able to get a window into their child’s thinking and problem-solving skills by watching them interact with this provocation.  And of course, I felt it would be fun to make and test my own marble run in order to connect with the children!  


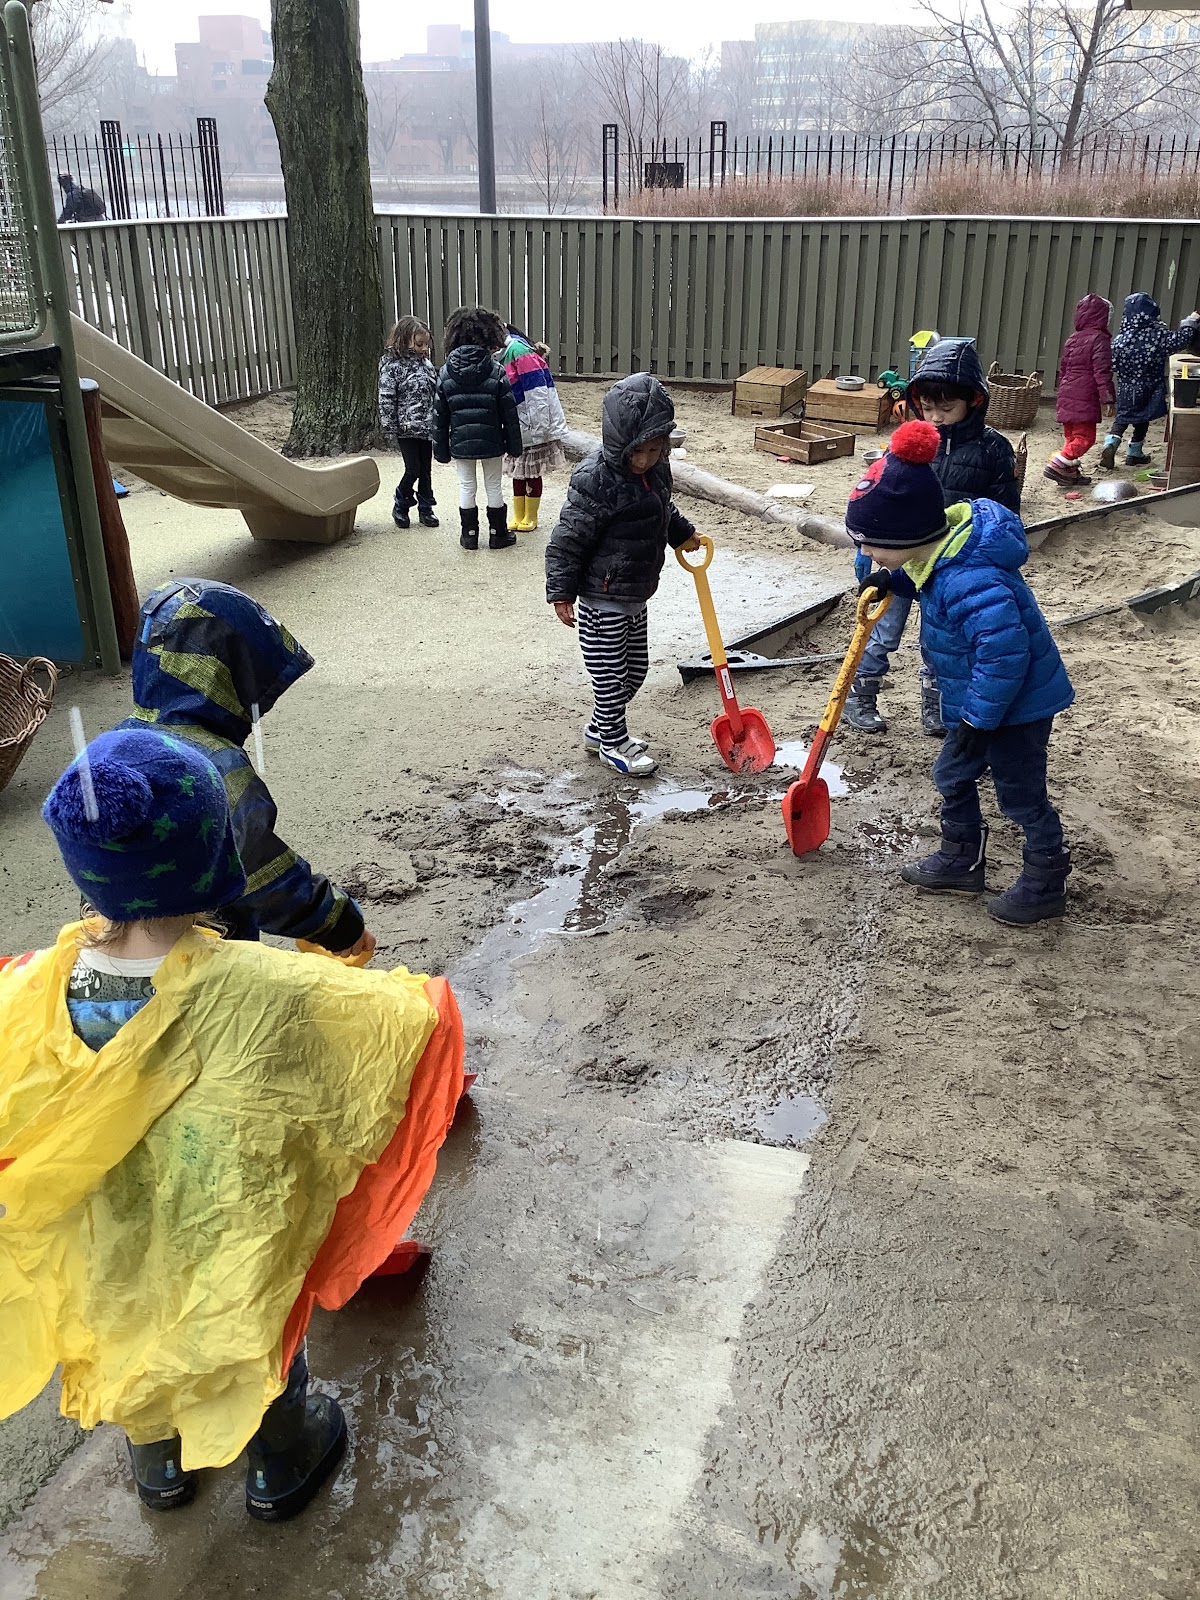
The children create a pathway for rainwater to flow through mud and sand on the playground.


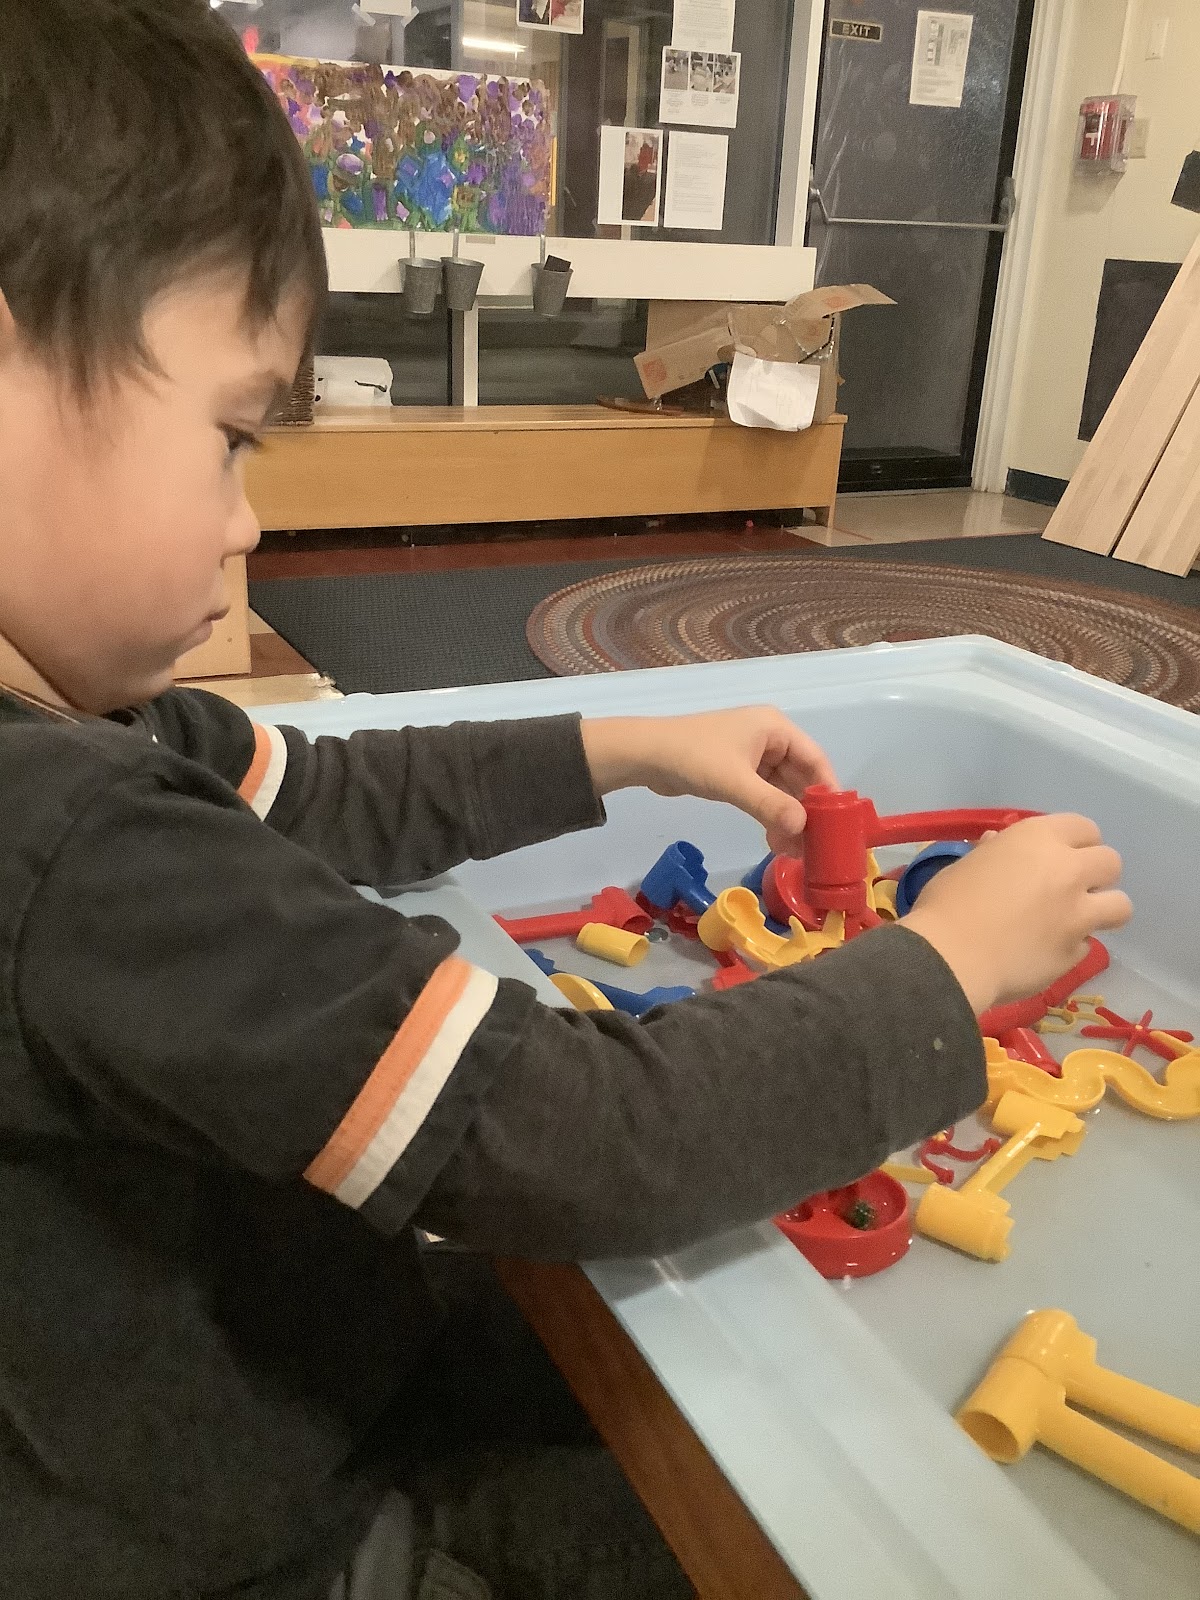
Nate lifts the marble run up at an angle to catalyze the marble and water to pass through in the classroom sensory table.


The Provocation:  
Create your own marble run using the materials you have at home! This is a great opportunity to explore concepts related to pathways, trajectory, and motion.  


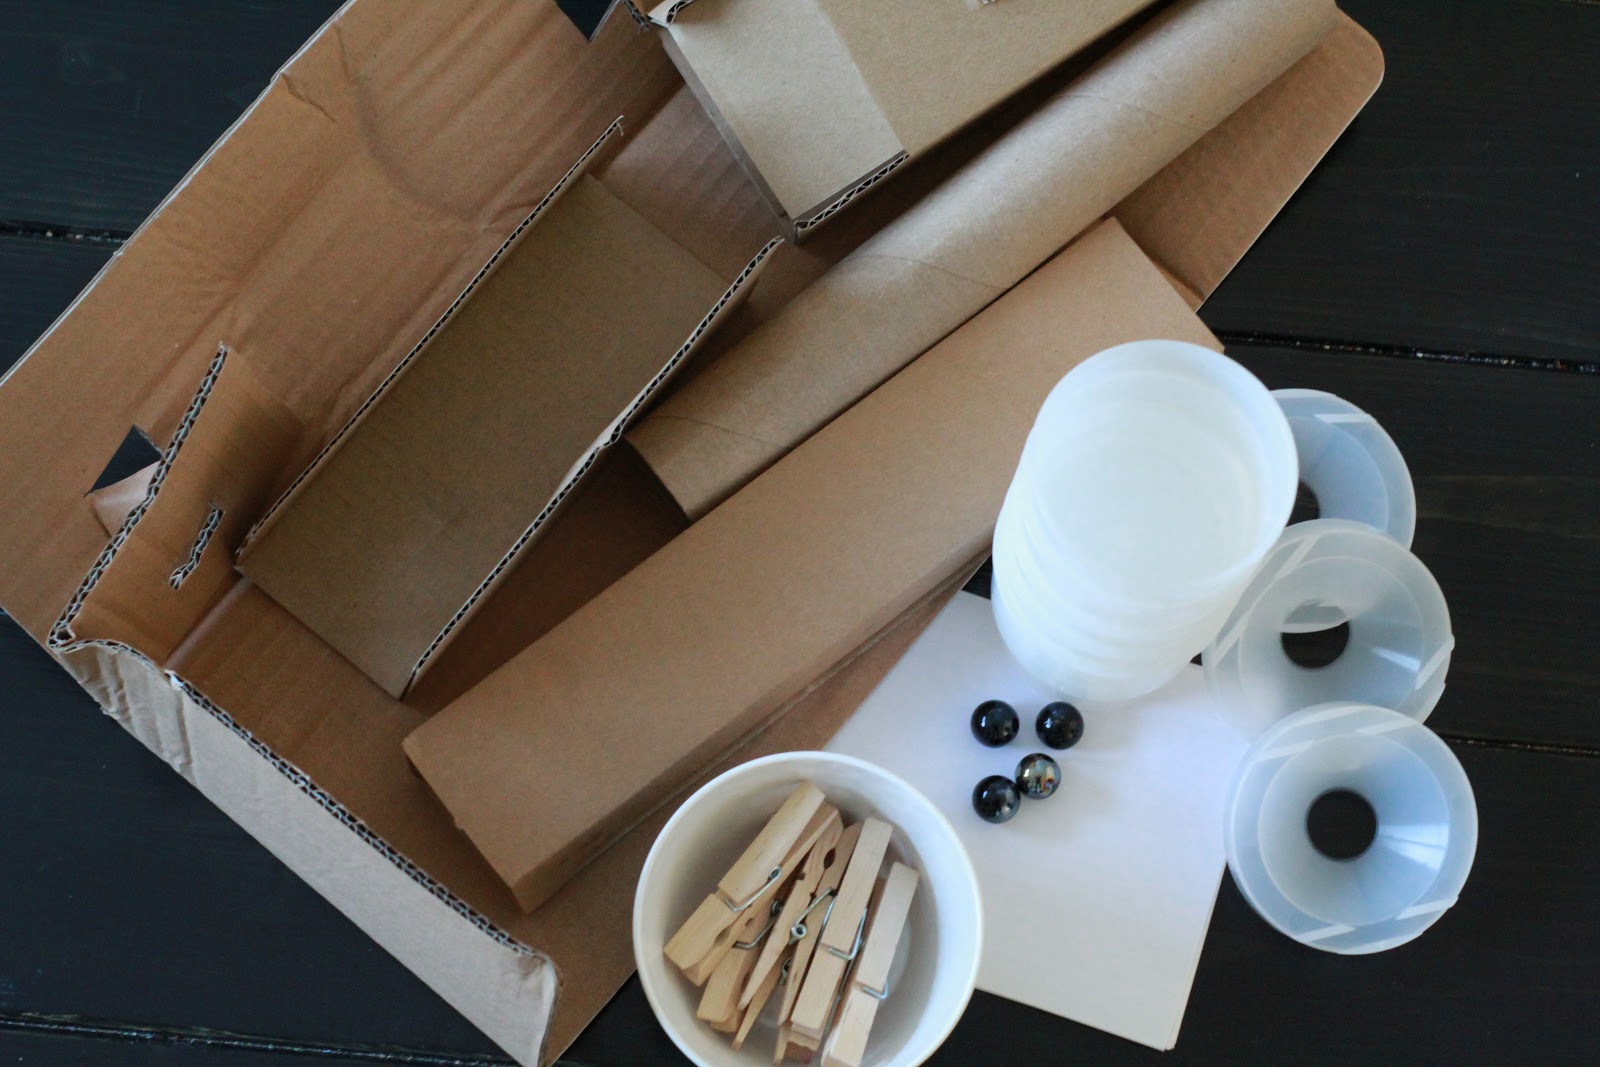
The materials that I found at home to use for this provocation were: 


Cardboard pieces
Clothespins
Plastic cups
Plastic lids to paint containers 
Paper towel roll
Index cards
Marbles 


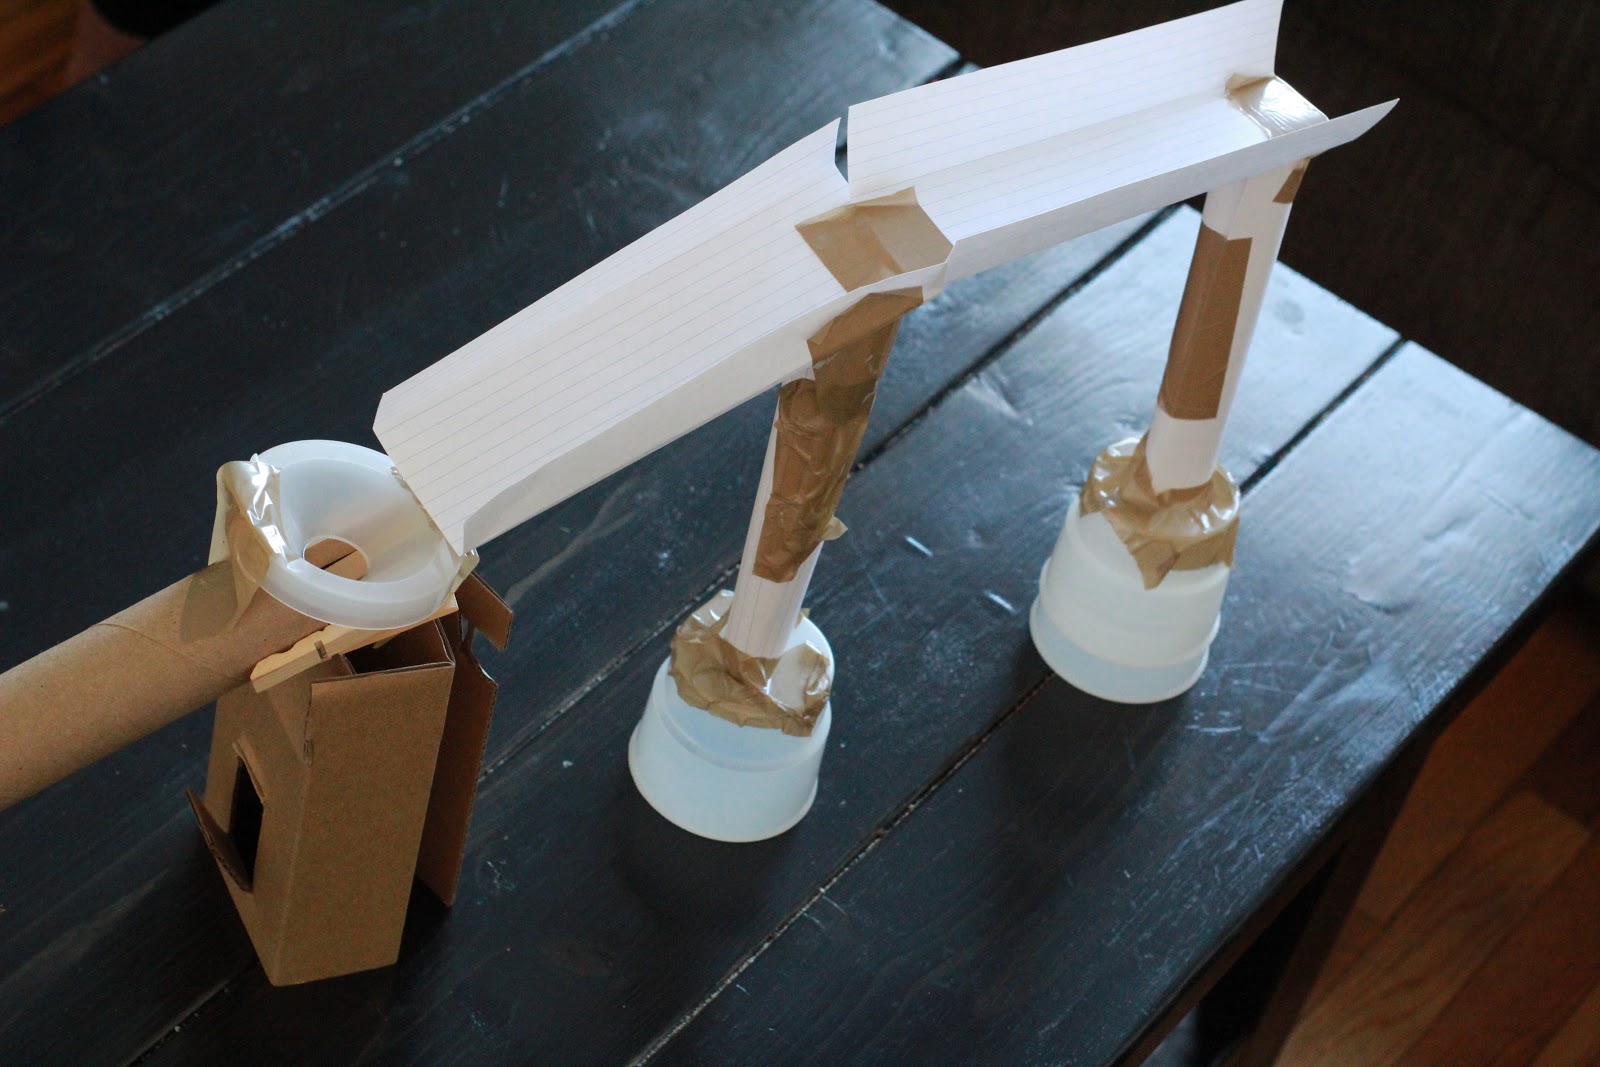
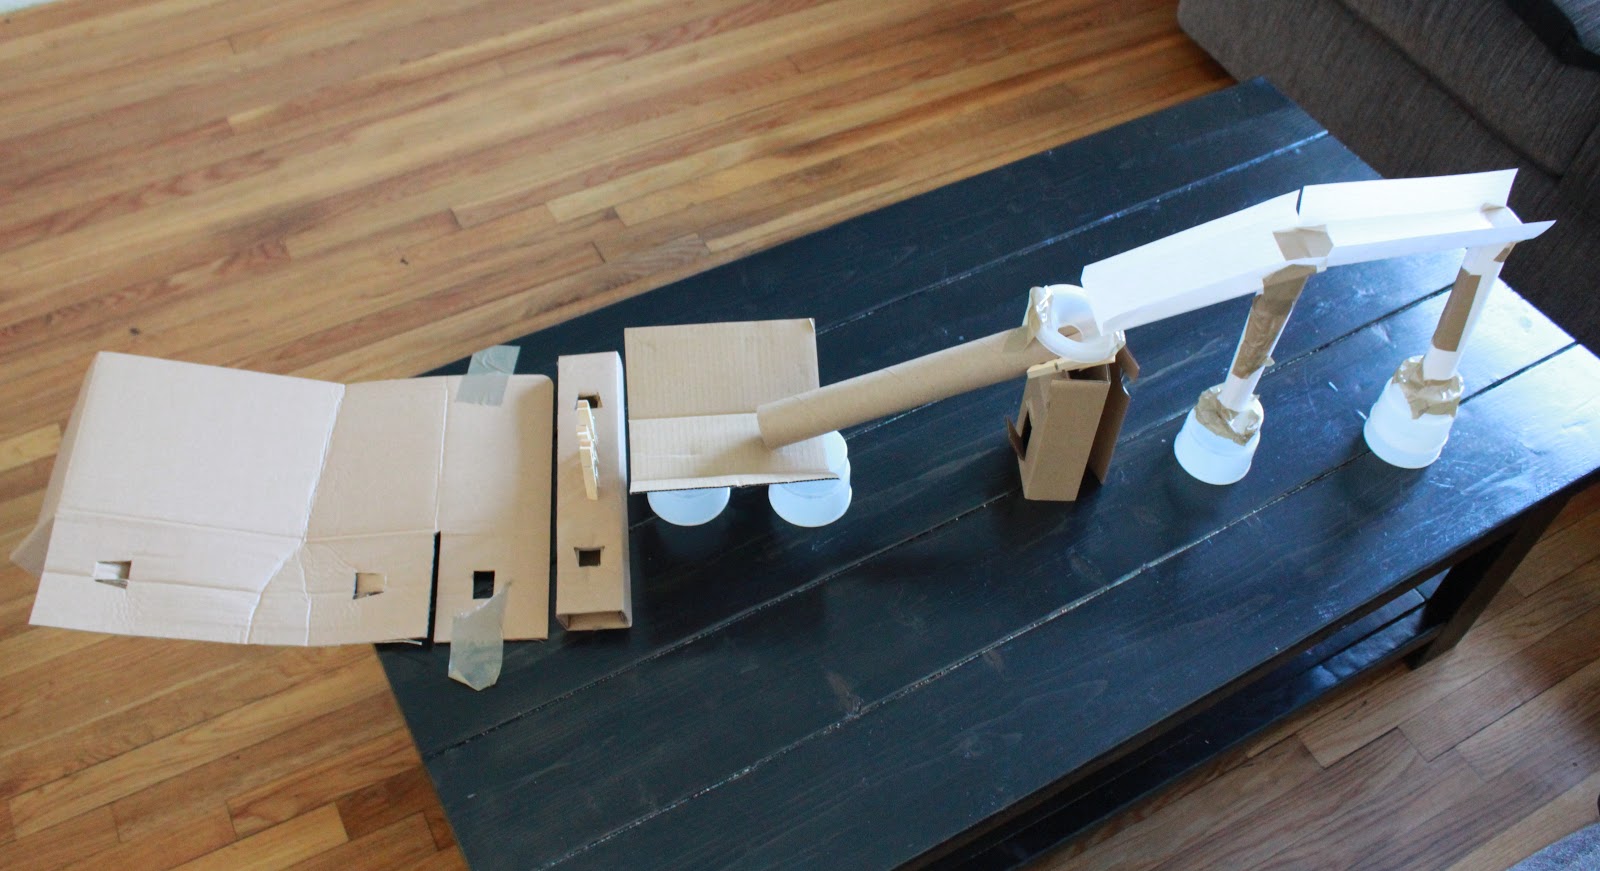
My husband, Kevin, and I worked together to create a marble run that would knock down clothespins at the end.


At first, a part of our marble run looked like this, but the marble kept bouncing off of the plastic funnel-shaped piece. 


We decided to use a clothespin as a wall to block the marble from bouncing out. 


Here is what we came up with!


Materials, Questions, Extensions 


Other material suggestions:
-Popsicle sticks 
-Scrap wood or metal
-Cans
-Wine corks
-Blocks
-PVC pipe
-Envelopes
-Wooden train tracks 
-Tape rolls
-Balls
-Water beads

Questions to ask while children are playing: 
-How will you get the marble to move?
-What do you notice about how the marble rolls through the marble run?  
-How can we change what happens?
-How could you make the marble move slower?  Faster?


Ways to extend this provocation: 
-Try to get the marble to hit a certain target (for example, land into a cup or knock something over).
-Create pathways for use with sensory materials such as sand or water. 
- Create several marble runs to race against each other.

Wednesday, April 1, 2020

The Possibilities of Paint - Ideas for At Home


Let's talk about paint!


For some people, the idea of painting at home with their young child is exciting. For other people, it is intimidating. For almost everyone, the word "messy" probably comes to mind.

At the same time, part of what is wonderful about paint is its possibility for expression. The exploration of gesture, color, and (especially with thicker paints) texture is a beautiful outlet for anyone (not just children), and can be an excellent way to center ourselves in the moment. This can lead to messiness, but, to me, the value of what is at work behind the messiness far outweighs the momentary stress of having to clean up a painty child.

So how do you set up paint at home in a way that feels manageable while still allowing your child freedom to actually explore the material? What if you don't have a ton of art supplies lying around? How can I be a part of my child's paint experience without taking it over?

Let's talk about these things!


Minimizing Mess

What can I handle?
Before setting up, think a bit about how much "mess" you feel comfortable with. Are you willing to risk some paint getting on the floor or a cabinet? What about paint getting on your child/their clothes/your clothes? Answering these questions honestly can help you decide what sort of experience you want to curate.

Choosing a setting:
A few options for setting up include...
- seated at a table
- in a dedicated space on the floor 
- outside (if it is warm enough and an outdoor space is available)
- in the tub (for super easy clean-up)
- at an easel or upright space (if you don't have an easel, you can take paper onto the refrigerator, kitchen cabinet, or wall)

Selecting your wardrobe:
No matter what the set-up, I would suggest that you (the adult) wear clothes that you don't mind getting painty!
For your child, you can choose between stripping to a diaper or undies OR putting on some paint-friendly clothes (either their own clothes that you don't mind getting messy or - my personal fave - an oversized t-shirt).

Protecting surfaces: 
Whether you are using a table or the floor, it is helpful to have something underneath your painting area to both protect whatever surface your painting on AND to define the space visually. Some possible materials to use for covering your floor or table include:
- a canvas dropcloth
- a table cloth
- a tarp
- a sheet
- large sheets of newspaper or other paper
- a towel (less ideal for table due to the thickness)
- parchment paper or plastic wrap (for table)

Prepare for clean-up:
It is helpful to set up near a bathroom or kitchen in order to be close to the sink, but whether or not this is possible, you can still be ready for clean-up by keeping these things close by!
- damp washcloths (some children might want one nearby to use as they go)
- a bowl or bin to put paint supplies in when finished (add water and soap and you now have a water activity!)
- a towel (to wrap up a messy kiddo)


Collecting Supplies: Recipes, Inspiration, and More


Paints
If you have washable tempera paint or watercolor paints (either liquid watercolor or a palette of dry color), these are excellent options to use at home. If you don't have either of these, never fear - you can make your own paint! Both of these paints are thick and fun to use for textural explorations. They will last for a few weeks if refrigerated. Offer them in small cups or bowls, in an ice cube tray, or straight onto the paper!

No-cook Flour + Salt Paint
-Mix together 1/2 cup of flour and 1/2 cup of salt.
- Slowly mix in 1/2 cup of water.
- Once smooth, divide into containers and add food coloring or liquid watercolor for color.

Cooked Finger Paint
-Stir 1/2 cup of flour with 1 cup of water in a pot over medium heat until it becomes a paste-like consistency and begins to pull away from the pot.
- Add a pinch of salt.
- Add 1/4 cup (or more as needed) of cold water to get your desired consistency.
- Divide into containers and add food coloring or liquid watercolor.

Painting Tools
Although brushes are the traditional tool for painting, they are by no means the only thing you can use! Here are a few other ideas for things to set out with your paint:
- cups or jars, spoons, and popsicle sticks for mixing colors
- leaves, flowers, pinecones, rocks (to use as paint tools or be painted on!)
- chopsticks, q-tips, sticks, combs, and forks for making lines through thick paint
- lids, spools, and other loose parts to use as stamps
- toy vehicles to make tracks through paint
- cotton-balls
- coffee filters
- sponges (as is or cut into shapes)
- droppers
- squeeze bottles
- and fingers of course!

Parent as Partner
So your paint experience is all set... but what should YOU do as your child paints? Here are a few suggestions:
- Paint on your own paper or collaboratively (if your child is so inclined) while echoing your child's movements - let them be the teacher! 
- Paint nearby to offer simple suggestions for how to use the materials (such as how to drag a comb to make lines, press a painted flower onto paper to make a print, or create a pattern using different colors or shapes). 
- Assume the role of documentarian and prop master - focus on taking pictures (and even taking notes if you want to try it!) and having extra paint, tools, and paper at the ready.
- Start in the abstract rather than jumping in to representational paintings (this can easily distract children from their work as they become more invested in what you are doing).

A few tips if children want you to paint for them or get discouraged because "yours is better":
- Gently say that you are not going to paint for them, but would be happy to show them how you did a certain technique for them to try. Walk them through it, with lots of encouragement. Then find something that you would like them to teach you how to do.
- Remind them that you have lived a lot longer than them and have had a lot more opportunities to practice! This is a great opportunity for them to start practicing, too.

**Also, check out these posts for preschool, toddler, and infant parents!**

Be well and enjoy!
Katie & Nova


Tuesday, March 24, 2020

What to do with Water? - Ideas for At Home

Have you ever wished that you had a sensory table at home? Well here are a few ideas for how to set up a water exploration space! You can go as simple or as elaborate as you would like, and there are several ways you can tailor what you offer to fit your space and the interests and age of your child! Of course, you could always explore other sensory materials in similar set-ups, but since water is something we all have access to, that is what I will focus on here.


Style #1: Simple and Spontaneous
   
The basic idea: find a wide, open bin or container with a flat bottom, fill it with water, and put it on the floor on top of a towel. This is something that I've pulled out multiple times when Nova has decided that all she wants to do is play with the cat's water dish. When she was still a baby, I used a ceramic baking dish (see above), because it had lower sides that she could reach over easily, and it was a little heavier and harder for her to slide around or accidentally tip over (kudos to former teacher Seana Williamson for the original inspiration). Now that she is a toddler, I have been using a plastic bin that is deeper and less breakable. 


 Style #2: Water Exploration Station


The basic idea: take the container described in the section above, elevate it, and add more surface space for transferring water. Maybe you have a child-level table that will hold your water bin, or maybe (like me) you have a ton of cardboard boxes still hanging around from when you moved. Place your container on top of whatever surface you choose in order to bring it to a good height for your child to be able to scoop and dump. It is nice to have extra space along the side for other containers to be added or for setting down utensils that aren't in use. I put together the above set-up in a matter of minutes yesterday by taping the water bin to a cardboard box with packing tape (I probably didn't really need to do this, but I figured better safe than sorry), lining the leftover box surface with a kitchen towel, and adding another plastic bin with the lid still on as additional "counter space."

What goes with water? - Material Suggestions

Now that you have your "water table," here are a few ideas for different types of set-ups you can create.

Cooking and Mixing: bowls, whisks, measuring spoons, measuring cups, ladles, muffin tins... basically whatever you want to grab out of the kitchen

Fluid Dynamics: funnels, containers of different heights and sizes (preferably clear or translucent), scoops, droppers, basters

Paper Pulp: sheets of paper (ripped up or not) to submerge in the water; you can also offer surfaces to place the pulp to dry, such as plastic-wrap lined cooling racks or bowls to create dome sculptures. Just playing with the strange squishiness of wet paper can be pretty fun on its own, too.

Color Experiments: small containers of different colors with spoons or droppers (or squeeze bottles if you have them!) full of colored water (I like to use liquid watercolor paint, since it is washable); or freeze ice cubes with different colored water, then add them into the clear water to watch it change.

Bubbles: there are lots of tips for making bubble solution if you want to actually blow bubbles, but if you just want sudsy water, any dish soap will do. Combine with materials for stirring up more foam (whisks are great for this) and scooping and transferring it. If you are trying to blow actual bubbles, you can make some bubble blowing tools at home, too.

Nature's Gifts: Combining natural materials with water is always great fun. Rocks, shells, leaves, pinecones (watch what happens if you submerge dry pinecones in water for awhile - it's fascinating!), flowers, etc. can all lead to interesting games in the water table. If you have any large rocks, it can be interesting to try brushing water onto their surfaces and seeing how the color changes.

Mix and Match: And of course, any of the above ideas can be combined!


A few general tips:
- Put at least one towel on the floor AND have an extra on hand to wipe up additional spills. 

- Set up in the kitchen if possible - if not, try to be near the kitchen or bathroom so you have easy access to a sink for either getting more water or pouring water out, as well as materials for clean up.

- It's okay to set limits, AND it's fun to look for possibilities! For instance, one day Nova started to transport water across the kitchen to her pretend cooking area, leaving a trail of drips across the floor. I ushered her back over to the water-play zone, while also bringing some of her play pots and pans back with us so she could include them in her water experience.

- You can decide how "permanent" you would like it to be. Maybe you create a set-up that you leave out for a few days or more. Maybe you keep your materials tucked in a corner to pull out as needed. Maybe you set something out, then put it all away when you are done because the last thing you need is more piles cluttering up the house. Do what works for you!


- Start out simple - you can always add more later! Both at home and at work, I often have an extra element set aside to bring out when interest starts to wane (such as the colored ice cubes seen above). This helps to extend the experience!

I hope this offers you some ideas for your days at home!

Be well,
Katie (and Nova)

#Beautyinthischaos

Dear PTCC community (and beyond),

Just as so many things have shifted as a result of the current international health crisis, so too are we going to shift to using this blog in a different way. We will be posting some of the beautiful things that staff have been creating as a result of their time working from home - read-aloud videos, tutorials and ideas for projects at home, reflections on readings, and more. We hope this will help us stay connected, make the work of teachers visible to others in our community, and also make it easier to access the content being created. The hashtag in the title comes from a former PTCC teacher, Seana Williamson, who is encouraging people to share exactly that - the beauty they are finding in this chaotic time. We would like to think that these offerings from teachers are one instance of such beauty.

Cheers,
Katie, Kendra, and the PTCC staff


Tuesday, January 15, 2019

An Anti-bias Work Team at PTCC

This year Peabody Terrace Children's center has an Anti-bias Education Work Team. It is composed of veteran PTCC teachers eager to spend the year learning skills and content necessary to create emergent anti-bias curriculum with children, colleagues and families in this way. Our work team is shaped by the participants, but the administrators and I created some structure to define it.


Our learning goals.
Every member will be able to:
  • Assess and increase our understanding of our own racial identity, biases, privileges and areas of growth.
  • Recognize bias in the systems in which we play a part
  • Work together to support systemic change; here at PTCC and elsewhere.
  • Appropriately talk to adults and children about what we know.
The administrative team has charged this work team to:


  • Create a strong, shared definition for “anti-bias education”
  • Pursue internal and external research to answer a question relevant to our work
  • Assess our center’s anti-bias practice
  • Develop shared goals/plan for institutional change
  • Create examples of in-depth, pro-active, multi-disciplinary, anti-bias education at PTCC
The anti-bias work team is made up of teachers who...


Have worked here for at least a year. To honor the special work of teachers in their first year at a new school we are only opening this learning opportunity to more veteran teachers.


Want to read, watch, listen and learn on our own time. We expect teachers to put our professional development hours toward this effort because it requires significant learning.


Are ready to try new anti-bias teaching strategies and practices in their classroom. Like our students, we learn by doing.We support one another as we take risks together.


Can share our learning with the community. "Each one teach one." is an African American proverb that comes to us from enslaved African people who taught one another literacy and other skills and practices to resist and escape enslavement. These words may have been brought to this continent by their captured ancestors who held knowledge as a liberatory gift that comes with an obligation to share with others. This sustaining belief and effective strategy supported civil rights organizers and others working for justice. In this tradition, we will share our learning with our community; through conversations, team meetings, documentation, and a culminating presentation.


Structure:
We meet once a month to learn and reflect. We've decided to use John Nimmo and Debbie LeeKeenan's Strategic Planning process from their book Leading Anti-bias Early Childhood Programs; A Guide for Change.